Before learning about the DSHOT protocol my plan was to try writing the flight controller in Python. My main reason for this is that I’m hoping to use the Raspberry Pi’s Sense HAT for its gyroscope and other sensors to stabilise the quadcopter. The Sense HAT has its own Python module, making it very easy to read from the sensors.
Initially I did have a quick go at implementing DSHOT in Python, though I didn’t expect it to work.
import RPi.GPIO as GPIO
import time
import gc

# Hopefully reduce interruptions
gc.disable()

ESC_PIN = 19

# DSHOT150 TIMINGS (6.68us per frame)
T0H = 0.00000250  # T0H = 2500ns
T0L = 0.00000418  # T0L = 4180ns
T1H = 0.00000500  # T1H = 5000ns
T1L = 0.00000168  # T1L = 1680ns

INTER_PACKET_DELAY = 0.00002  # 20us

def transmit_one():
    GPIO.output(ESC_PIN, GPIO.HIGH)
    time.sleep(T1H)
    GPIO.output(ESC_PIN, GPIO.LOW)
    time.sleep(T1L)

def transmit_zero():
    GPIO.output(ESC_PIN, GPIO.HIGH)
    time.sleep(T0H)
    GPIO.output(ESC_PIN, GPIO.LOW)
    time.sleep(T0L)

def inter_packet_delay():
    time.sleep(INTER_PACKET_DELAY)

def transmit_value(value, telemetry=0):
    # Add telemetry bit
    packet_data = (value << 1) | (1 if telemetry else 0) # Calculate and add CRC crc_sum = (packet_data ^ (packet_data >> 4) ^ (packet_data >> 8)) & 0xf
    packet_data = (packet_data << 4) | crc_sum # Output the packet for bit in range(16): if (packet_data >> (15 - bit)) & 1:
            transmit_one()
        else:
            transmit_zero()

if __name__ == "__main__":
    # Setup GPIO
    GPIO.setmode(GPIO.BCM)
    GPIO.setup(ESC_PIN, GPIO.OUT)

    # Send reset value to arm the ESC
    print("RESETTING")
    for _ in range(20):
        transmit_value(0)
        inter_packet_delay()

    # Send values from 48 (throttle = 0) to 100
    for throttle in range(48, 100, 1):
        print("Throttle = {}".format(throttle))
        for _ in range(1000):
            transmit_value(throttle)
            inter_packet_delay()

    # Send reset again
    print("RESETTING")
    for _ in range(10):
        transmit_value(100)
        inter_packet_delay()
This code illustrates quite clearly (I feel) how the protocol is supposed to work, however the problem is that the length of time that time.sleep() takes is not guaranteed to be the amount requested, just that it will be at least that amount of time. My understanding is that the OS may context switch to do something else, which according to this benchmark can take in the order of microseconds (though that is for Intel’s architecture, Raspberry Pi’s ARM architecture may be different). In fact:
pi@raspberrypi:~ $ python -m timeit "time.sleep(0.000000001)"
100000 loops, best of 3: 2.07 usec per loop
pi@raspberrypi:~ $ python -m timeit "time.sleep(0.000000002)"
100000 loops, best of 3: 2.05 usec per loop
pi@raspberrypi:~ $ python -m timeit "time.sleep(0.000001)"
10000 loops, best of 3: 74.8 usec per loop
pi@raspberrypi:~ $ python -m timeit "time.sleep(0.000002)"
10000 loops, best of 3: 76 usec per loop
Trying to sleep for one or two nanoseconds results in a delay of at least two microseconds, and strangely trying to sleep for one or two microseconds results in a delay of around 74 microseconds. This is clearly not going to work for the timings I’ve requested. In fact, I’ve now measured the output of this program with an oscilloscope.
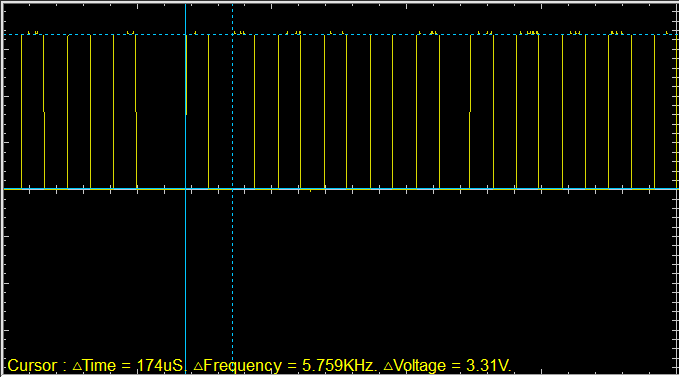
The waveform was essentially just a square wave with a period of about 174 microseconds. It looks nothing like the DSHOT frame I was trying to send and each period is around 26 times as long as it was meant to be (6.68 microseconds). I have since learned that the ESCs support multiple protocols (i.e. PWM based signals), which explains the little accident I had after running this code for the first time.
WARNING
These motors are powerful and the propeller blades spin fast. Keep out of the way of them and ensure that your quadcopter cannot accidentally fly toward you or anyone else. This is especially important when trying to develop your own control software – don’t start by putting the propellers on!
The quadcopter I’d built was on our coffee table in the living room and I was trying out different things trying to get the motor I’d soldered on to do something. I ran the above code (or something very similar) for the nth time expecting nothing to happen. Suddenly the propeller started turning at high speed, lifting itself up and pivoting towards my girlfriend’s foot which was resting on the table. Fortunately, it then cut through the ribbon cable which I’d used to connect the Raspberry Pi to a breadboard and then to the ESC which stopped the signal and thus the motor.

This was incredibly lucky. Please don’t do this!
So, I learned that using Python along was not going to work in any sensible way. After some reading I decided I would try using busy loops (looping many times doing very little, not voluntarily giving up control to the operating system) to get the accurate delays I wanted. The disadvantage of busy loops is that they take up a whole processor essentially doing nothing, which is not good for power efficiency or allowing the system to do anything else, but if it worked it would be a start. Due to the documentation on DSHOT being slightly lacking I wanted to give this the best chance of working and so I decided I would do this in C to eliminate any overheads that the Python interpreter might bring. I’ll discuss how this went in my next post.
Leave a Reply